- An old pruning saw
- Shifter or spanner and/or screwdriver to remove handle
- White vinegar
- Flat tub or container, long enough to hold blade
- Steel wool
- Rags
- Linseed oil
- Sandpaper
- Clamps or vice to hold saw
- Files to sharpen saw blade (optional)
- Offset tool (optional)
- 1.Remove the handle.
- 2.Fill the tub with enough white vinegar to cover the blade and place it in to soak; this will help clean off the rust. cLuke says: “For really rusty tools I generally leave them in the vinegar bath for a week. That’s enough time to remove most - if not all - of the rust and with very little elbow grease required. You can always check the metal components to see how they’re going; if there is still rust, leave them in a bit longer.”
- 3.Steel wool or even a rag is often enough to clean off the rust after a vinegar bath, and if it’s very rusted, then a wire brush can be used.
- 4.After cleaning, wipe down the blade to remove any moisture, then wipe the blade with oil to help protect it from rust in the future.
- 5.If needed, lightly sand the handle to remove any old varnish or rough edges. The, using the same oily rag, apply some linseed oil to the handle.
- 6.Put the saw and handle back together.
- 1.Clamp the saw on a bench or in a vice* with the serrated edge facing up. You’ll have to change the position of the saw in the vice as you go, to keep the area you are working on as still as possible.
- 2.Pruning saws are cross-cut saws, designed to cut across the grain, such as when cutting a branch. It also cuts on the pull action. There are lots of different saws – some have teeth in one direction, others in both directions. They are sharpened using different techniques. To sharpen this type of pruning saw, use a feather-edge file. First step is to run the flat side of the file across the top of all the teeth in one ‘swoosh’ motion. This is to level the teeth.
- 3.Second, sharpen every tooth along the bevel edge, one tooth at a time. Sharpen the teeth on one side and move around and do the other side.
- 4.Position your file at the same angle of the tooth (There are two angles to copy, the angle of the tooth and the angle of the bevel on the front edge of the tooth). Always move the file forward, not back and forth.
- 5.How many strokes on each tooth? That depends on the dullness of the saw. It may only require 1-2 strokes per tooth but if it’s an old dull saw, then it requires more. Use the same number of strokes on each tooth.
- 6.Setting the teeth. The teeth set on this pruning saw have an offset (the angle that the tooth is bent away from the centre of the blade). The offset stops the saw from jamming in wood. Luke has an offset tool to make sure the offset is maintained.
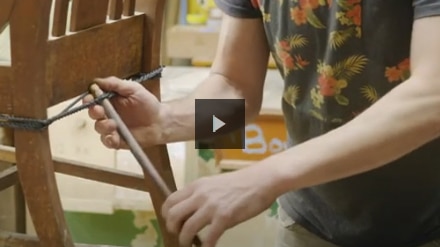
Start by placing the pruning saw blade against the edge of your workbench and then place a piece of timber on the other side. This act as your clamp. Attach a piece of rope to the leg of the workbench, then wrap it around the workbench, going over the block of wood holding the saw blade. Tie the other end of the rope to the leg of your workbench. The rope loop doesn’t need to be tight at this stage as you will tighten it using the stick or dowel. Insert your stick or piece of dowel vertically between two loops of the rope that are tied around the workbench and timber block with the saw blade in the centre. You then tighten the rope by twisting the stick or dowel.